Summary
- If your Windows 11 PC is slowing down, or you’re just looking to increase its performance, these simple tricks will help.
- Turning off Animation and Transparency effects can help reduce the burden on your GPU. Cleaning up your HDD or SSD is a great way to free up space and prevent your storage from slowing down.
- Adjusting your Windows 11 Power Plan to High Performance can help you get the performance boost you’re looking for, and disabling startup apps can help improve your PC’s boot time.
Nobody likes a slow computer, and sometimes, due to various factors, that can easily happen to your
Windows 11 PC
. Whether you recently upgraded to Windows 11 from Windows 10 or purchased a new PC with Windows 11 already installed, there are numerous settings you can adjust to enhance the speed and
increase the responsiveness
of Windows.
While your mileage may vary depending on your PC’s hardware, here are the five tricks I always use on any Windows 11 PC to maximize performance and
prevent performance headaches
from occurring in the first place.
Related
I powered-up my Windows 11 experience with Windows 25, and I don’t think I can go back
If you’re tired of Microsoft’s default Windows 11 interface, then Windows 25 has you covered — here’s what this community-created mod can deliver.
5
Disable Animation effects
Keep it simple
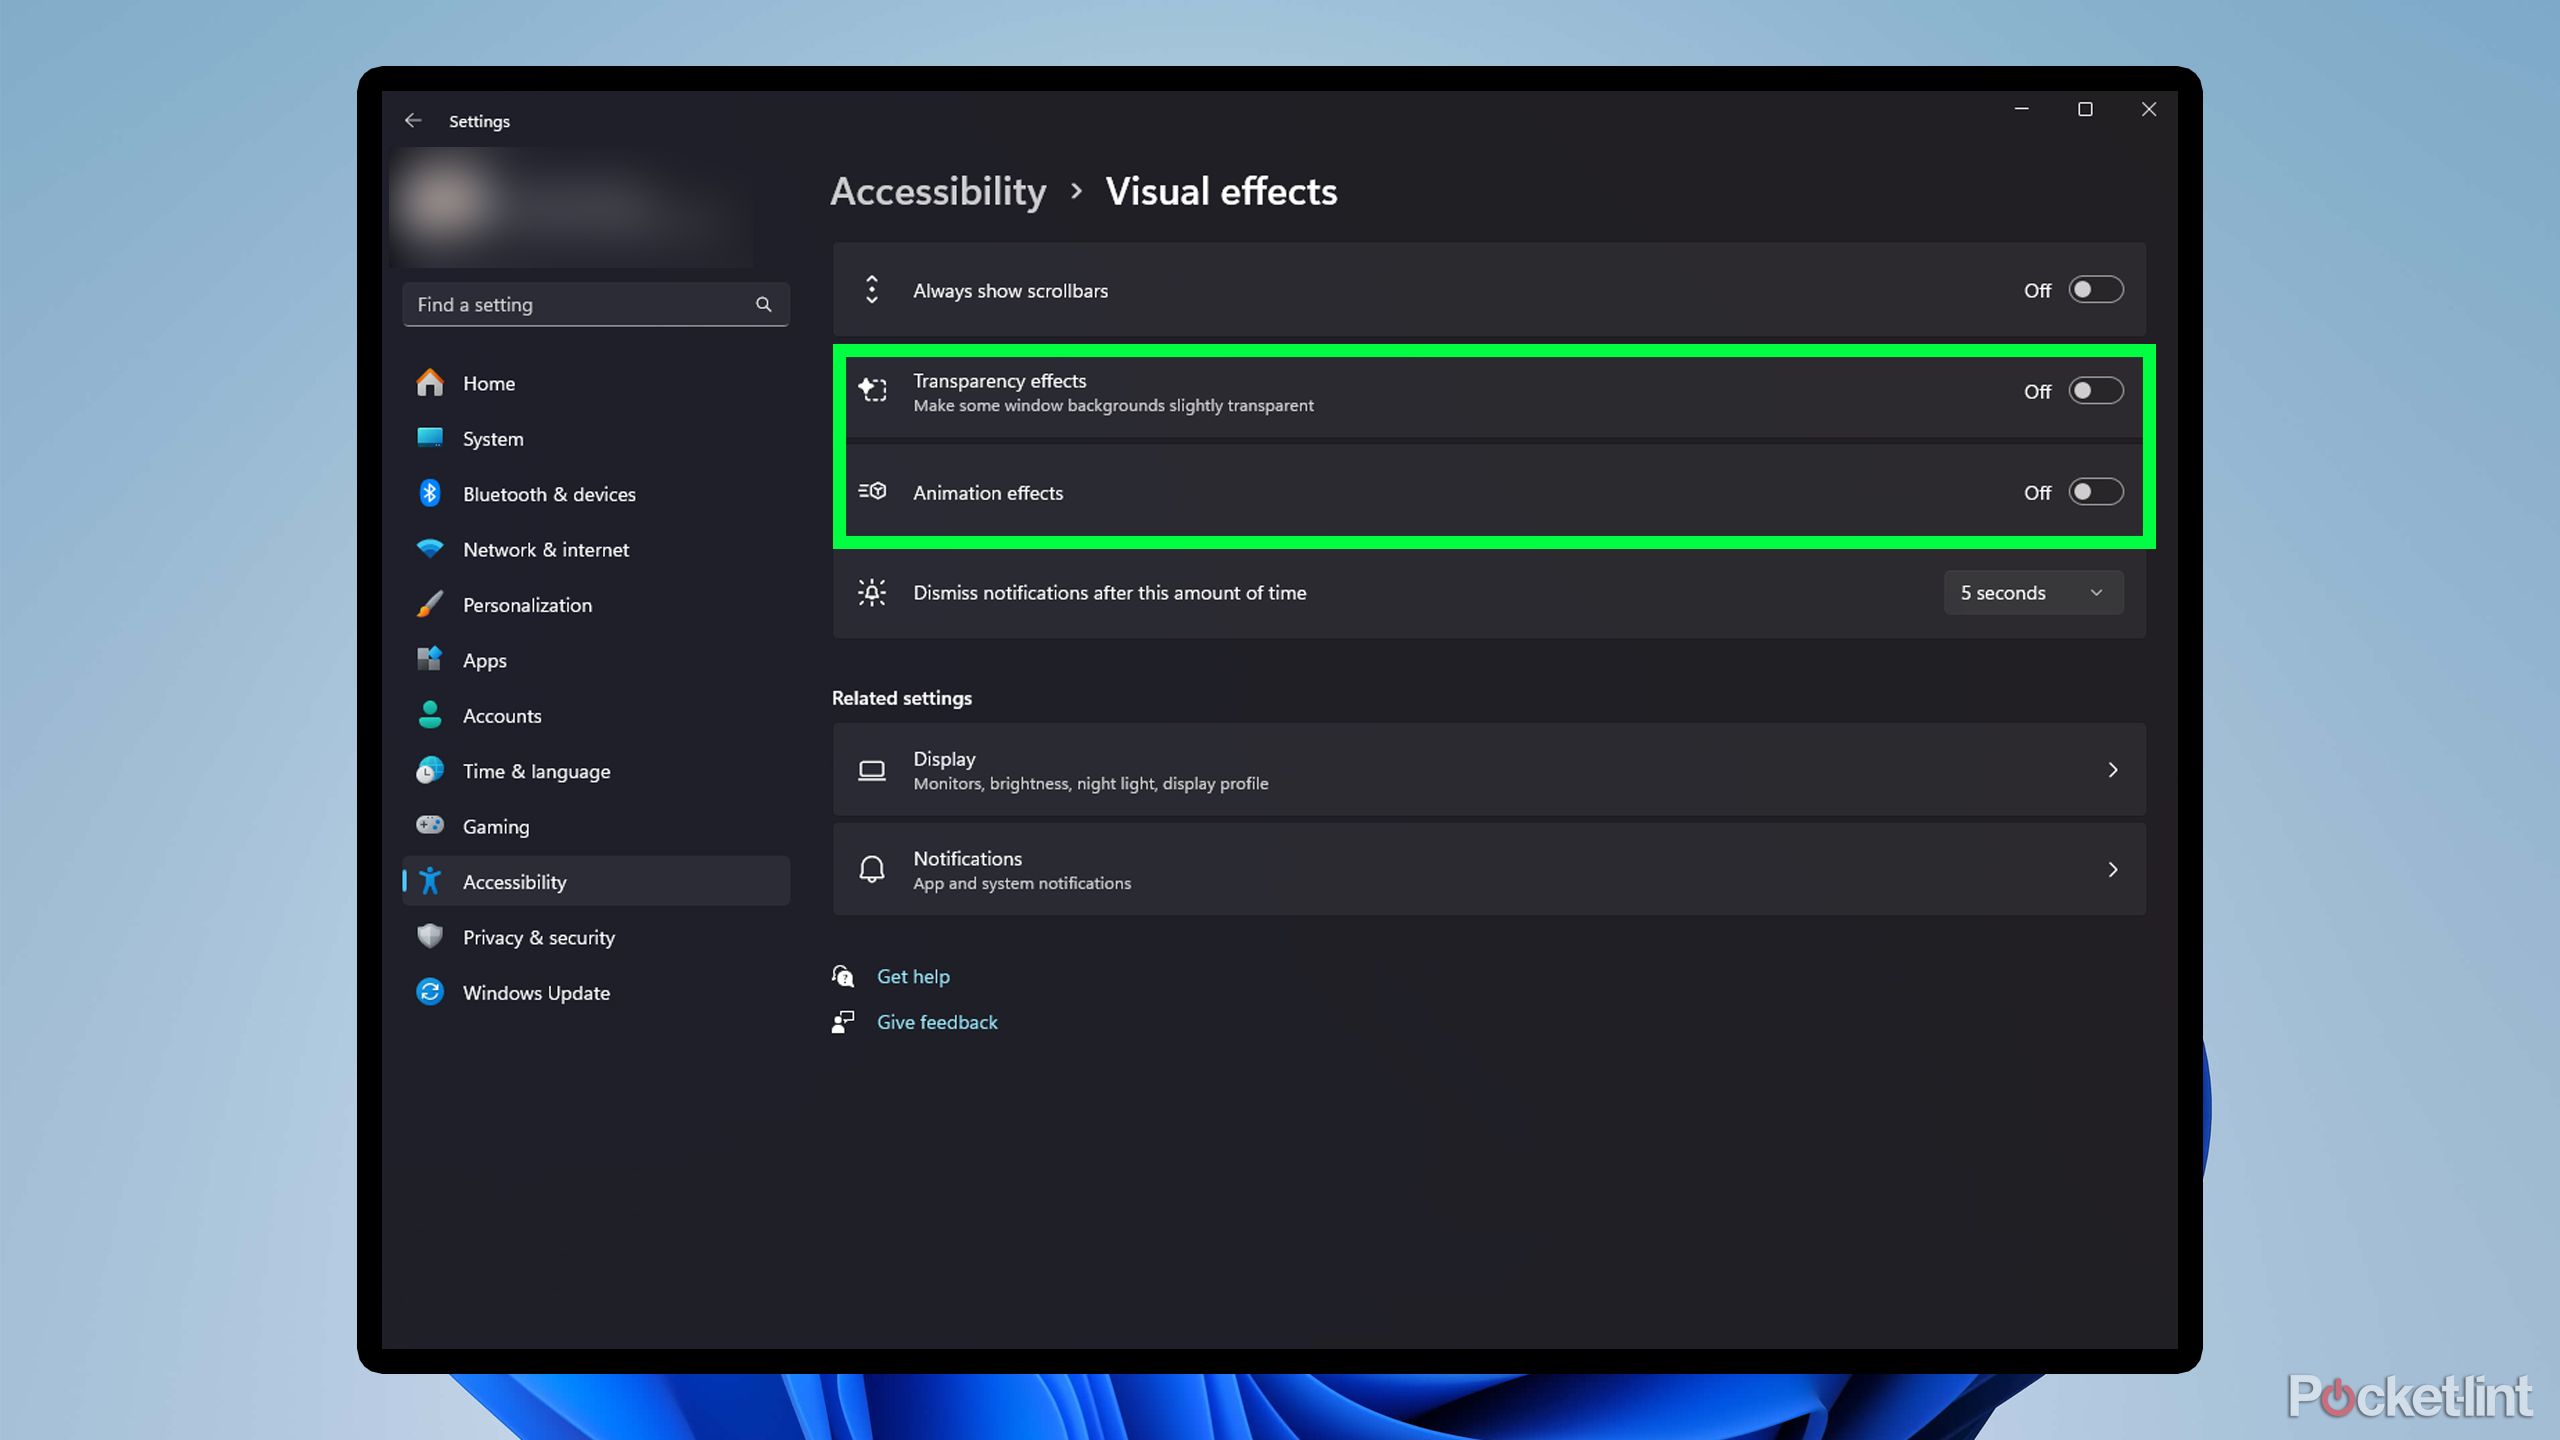
One of the first things I usually do to easily give my PC a little performance bump is disable an option called Animation effects and Transparency effects. Windows 11 includes animation effects that play when you perform certain actions, such as opening or closing a window or minimizing an app. While they may seem relatively harmless, depending on your PC’s hardware, they can slow things down.
By disabling Animation effects and Transparency effects, you can reduce the load on the GPU and improve Windows 11’s responsiveness, making apps and other windows feel snappier when you interact with them. To turn them off, go to Settings > Accessibility > Visual effects and toggle Animation effects and Transparency effects off.
Related
5 upcoming Windows 11 additions that I can’t wait for
Windows 11 remains a work in progress for Microsoft – here are 5 PC features the company is working on that have me eager to tap on Windows Update.
4
Clean up your HDD and SSD
Get rid of files and apps you don’t need
With the enormous file sizes of games and apps today, storage devices like hard disk drives (HDDs) and solid state drives (SSDs) can fill up relatively quickly. If you have Windows 11 running on an older HDD, this step is especially crucial for you, as cleaning up your hard drive can help speed things up drastically if you’ve noticed a slowdown.
Although SSDs are less prone to slowing down over time than HDDs, an SSD can slow down if it’s near or at full capacity. Even if your HDD or SSD isn’t close to full, cleaning up its files is a great way to free up space and prevent any performance issues in the future.
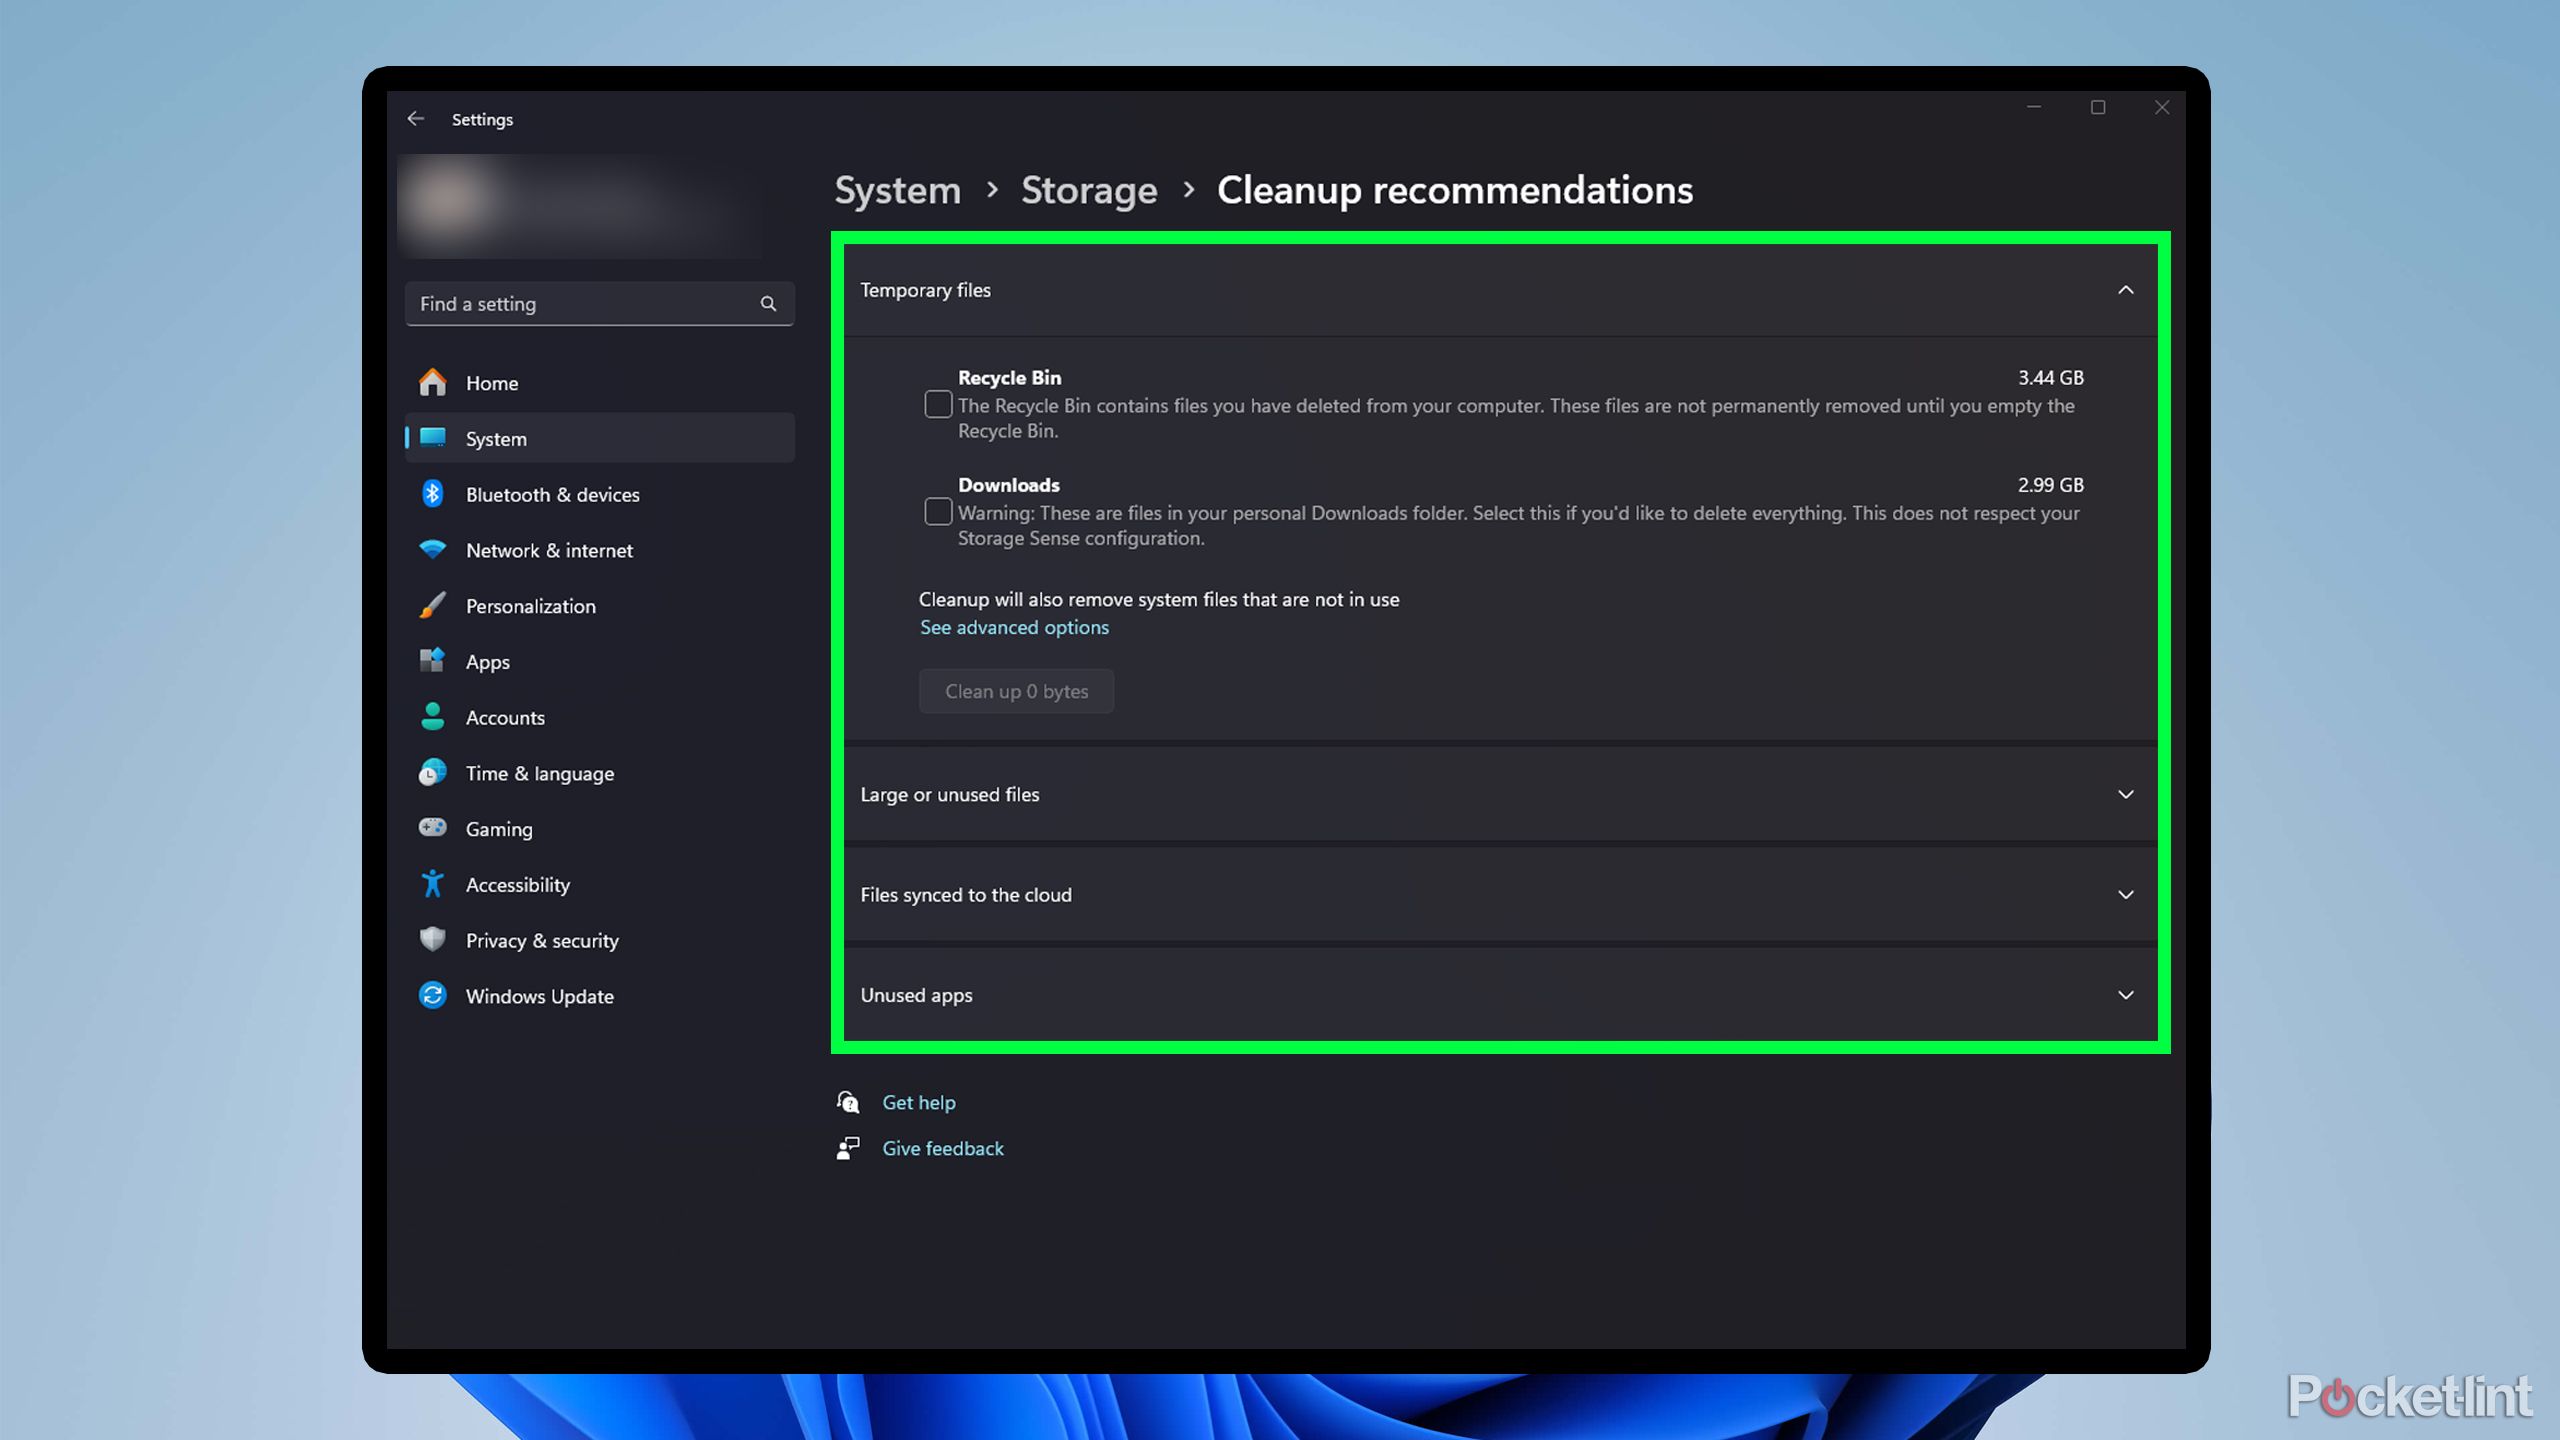
There are two ways to easily clean up your storage device with Windows 11. The first and simplest option is to head to Settings > System > Storage. Under Storage management, you’ll see a feature called Cleanup recommendations that you can use to see which files Windows suggests removing, including temporary files, large or unused files, files synced to the cloud, and unused apps.
The second option that I still rely on is the tried-and-tested legacy Disk Cleanup tool, which has been around since Windows 98. To find Disk Cleanup, simply search for it in the Windows search bar. Once you open it, choose the storage device you want to clean up, and Windows will scan it and provide you with recommendations for freeing up space and speeding it up.
As you tidy up your storage devices, consider reviewing all the installed apps you have and getting rid of any that you don’t use anymore to free up space.
Related
5 lesser-known Windows 11 features I can’t live without
Windows 11 comes packed full of useful features, here are five underrated ones I rely on everyday.
3
Adjust your power plan
Set your PC to High Performance if it needs it
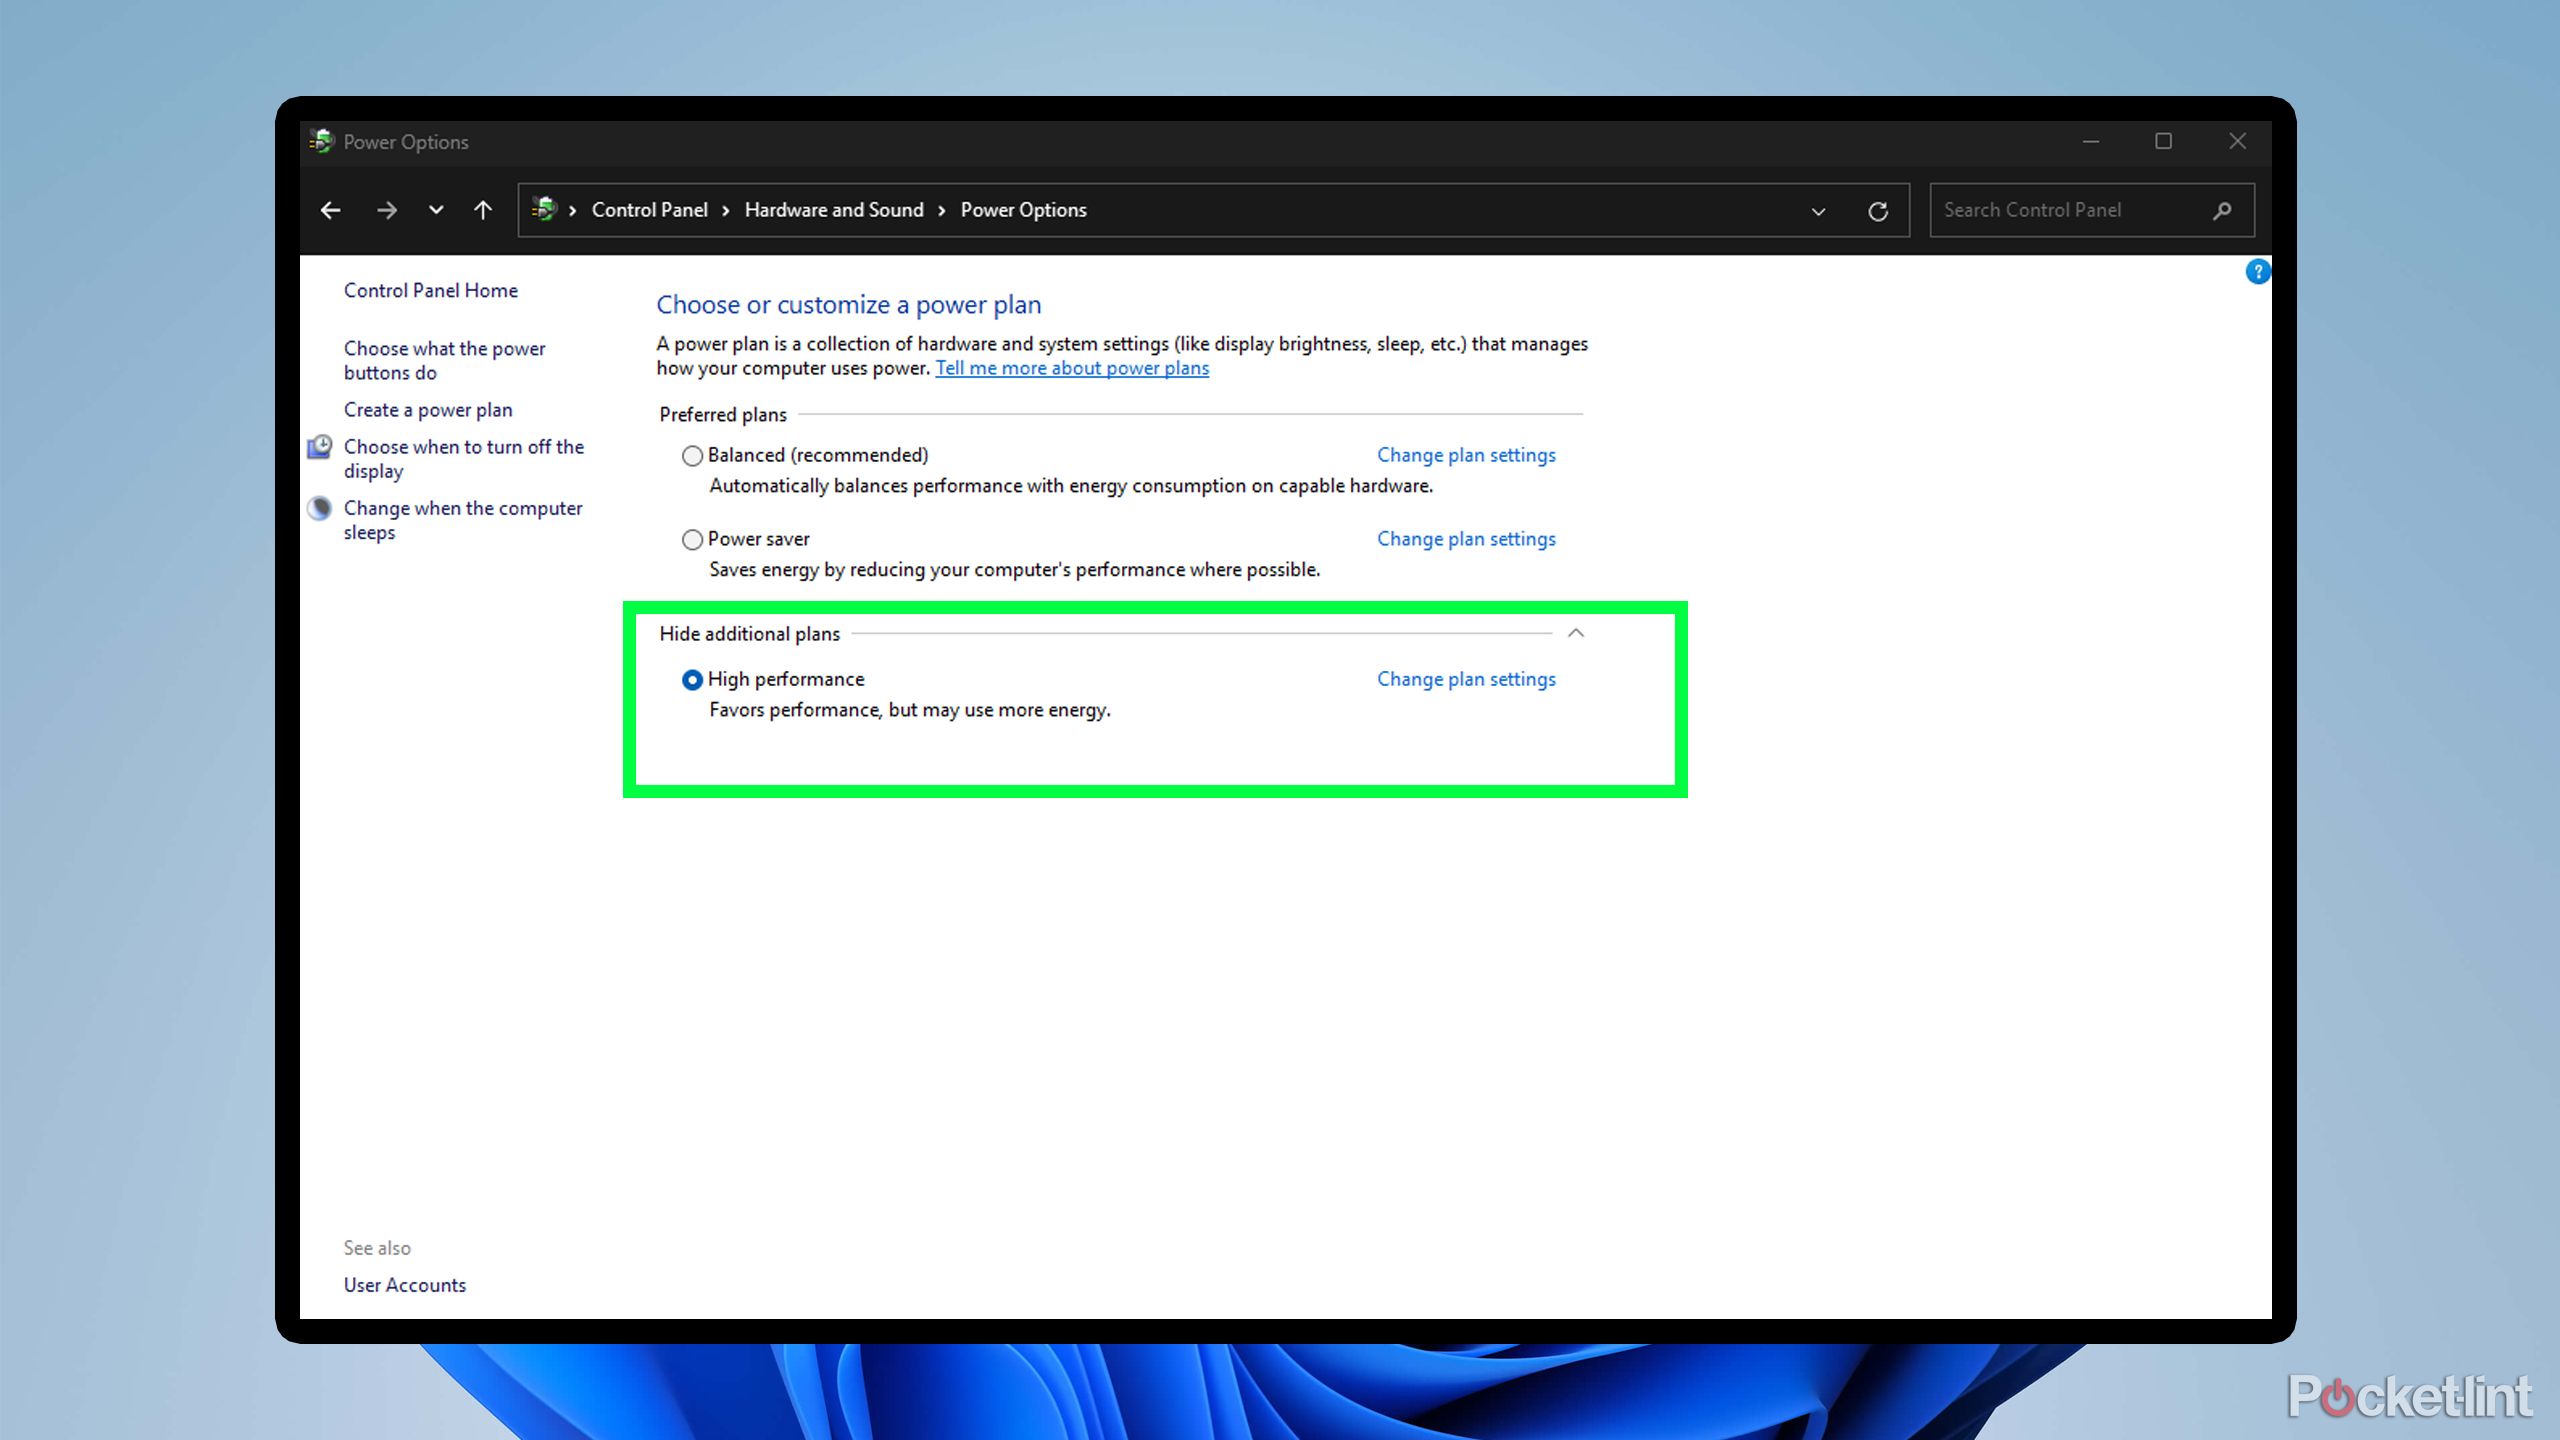
If you notice your PC slowing down in instances where it really shouldn’t be, changing your power plan in Windows 11 might help speed things up and reduce some of your performance frustrations. Windows has three main power plan options: Balanced, Power Saver, and High Performance. There is also a hidden option, dubbed Ultimate, which I’ll get into later. To change your PC’s power plan, use the Windows Search bar and type in “power plan.” Then select the option to Edit power plan.
On my three Windows 11 PCs, the power plan settings were always set to Balanced automatically. This means your PC automatically balances its performance and energy consumption. If you want to maximize your PC’s performance, setting it to High Performance will ensure you always get the best performance possible from your CPU, at the expense of using more power.
I recommend this setting if you’re running on older hardware, as it can help boost performance. If you’re running a newer CPU, like one of Intel’s or AMD’s latest chips from the past few years, you’re likely fine leaving it on Balanced, as they’re designed to adjust their performance on the fly.
If you want to maximize your performance on a powerful PC, there is a hidden option called Ultimate, which can be enabled using a command prompt in Windows PowerShell. It gives your PC the best possible performance it can provide, at the expense of power and longevity. To do this, launch PowerShell as an Administrator and enter the command line: powercfg -duplicatescheme e9a42b02-d5df-448d-aa00-03f14749eb61
Once you’ve done that, it will appear as a power plan in Windows power options. I recommend doing this only if you have an extremely capable PC and want to test its maximum performance in tasks like video editing or gaming.
Related
5 useful Windows 11 features I always enable first on a new PC
Windows 11 has many different settings, but these are the ones I always enable first to enhance my experience.
2
Reduce the number of startup apps
Make your boot time faster
I usually get the most frustrated with Windows when it is slow to start up. This can be due to several factors, such as using an HDD instead of a faster SSD. However, from a software perspective, the most common issue that slows down boot times is having too many apps open at startup. Some apps automatically set themselves to launch on startup when you download them, which can make your boot process take longer than usual.
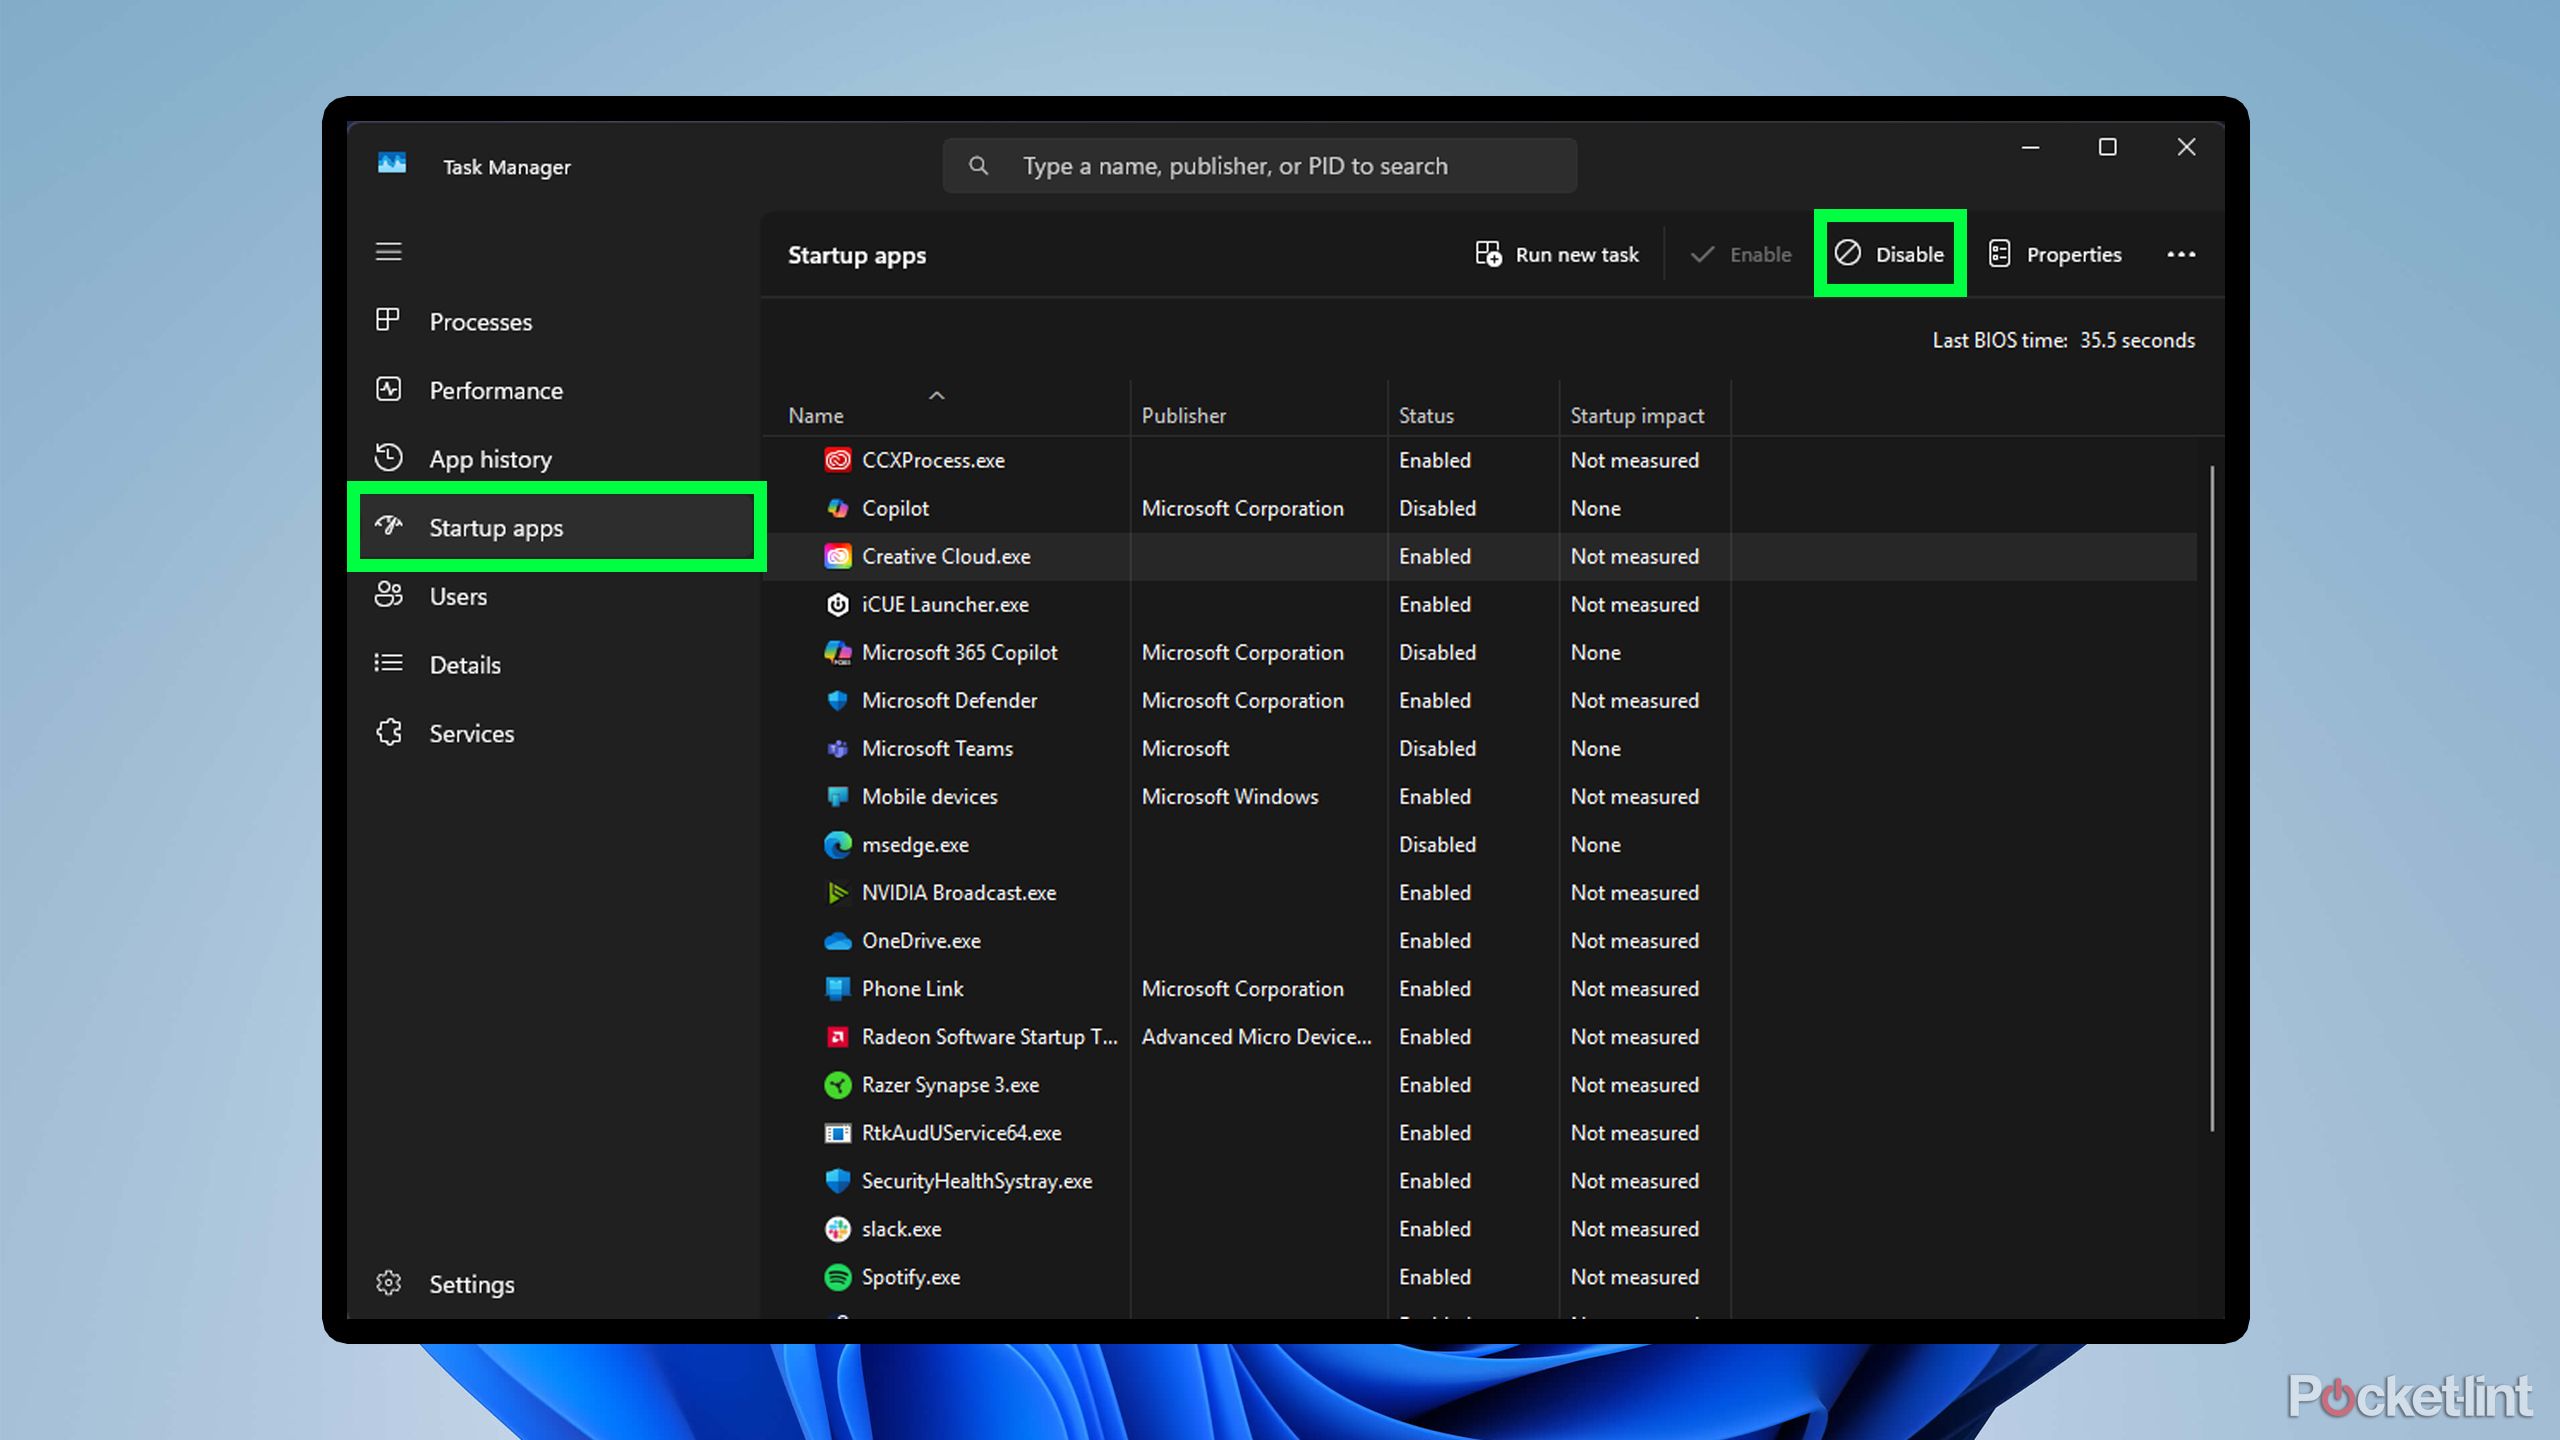
I always recommend to any Windows 11 user that you check your startup apps to see which ones you need and which ones you don’t to increase Windows 11’s responsiveness at boot. To do this, open Task Manager by simultaneously pressing Ctrl+Shift+Esc. Then navigate to Startup apps, and you’ll see all the apps that launch automatically when you log into Windows. The first thing I immediately disable is Copilot and Teams, since I don’t use them. My general rule of thumb is that if you don’t use an app within 10 minutes of starting your PC, you probably don’t need it on startup.
Related
How I flipped my aging Windows 10 machine into cold, hard cash
Microsoft is set to end support for its Windows 10 desktop OS in October of this year, but there’s no need to throw your old PC by the wayside.
1
Keep Windows and drivers updated
Windows Update can sometimes solve your problem
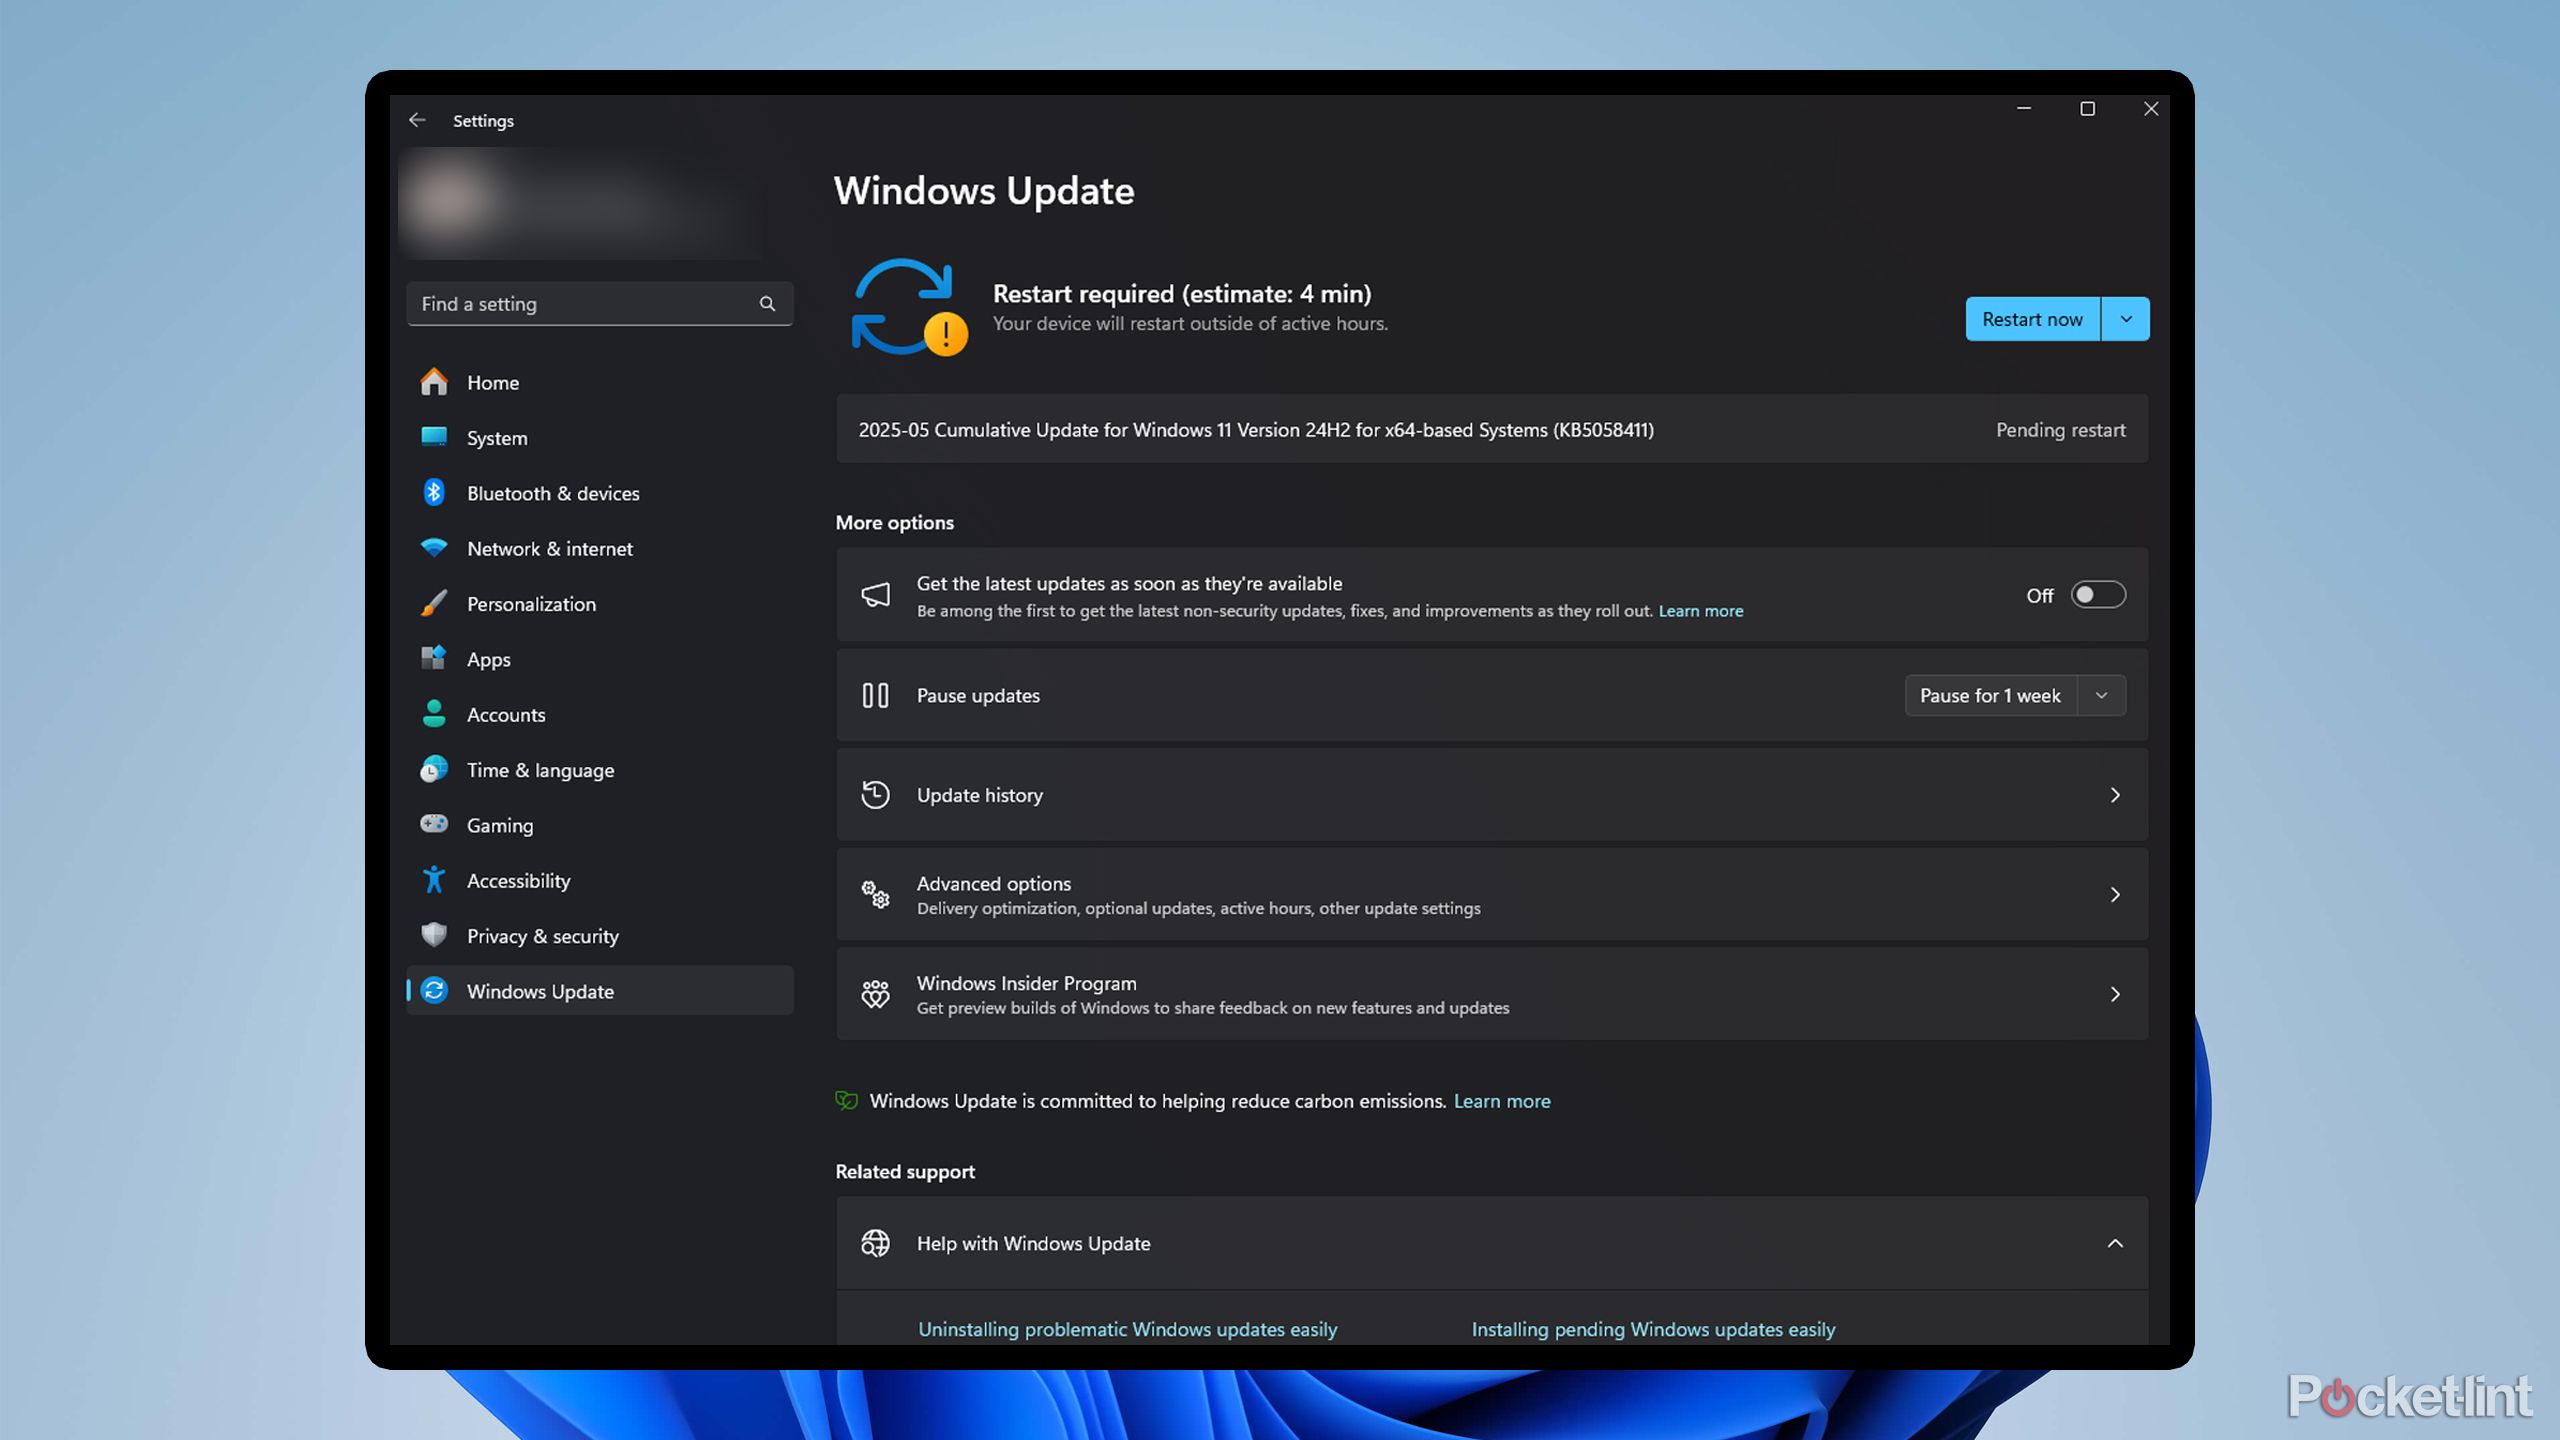
Finally, one of the best ways to keep your Windows 11 PC running smoothly is to ensure it has the latest drivers and Windows updates. If you don’t know what a driver is, it helps devices (like a mouse, keyboard, printer, headset, and more) communicate with Windows so they work properly.
Addtionally, having the latest Windows Update ensures your PC is secure and up-to-date with any of the latest enhancements Microsoft has made to Windows 11. Most of the time, these updates happen automatically, but if you’re experiencing issues with performance or a specific device, you can check for and manually install updates without Windows automatically doing it for you.
To check for Windows updates, simply go to Settings > Windows Update. There, you can check for updates and install them. In the same menu, you can find updates for specific features and drivers if you navigate to Advanced options and select Optional updates. You can also check for driver updates for particular devices by searching for and opening Device Manager within Windows.
Related
How PowerToys streamlined my Windows experience and why it should just be built in
PowerToys is Microsoft’s best-kept secret for improving your Windows experience.
Trending Products

Sceptre Curved 24.5-inch Gaming Monitor as mu...

SAMSUNG 34″ ViewFinity S50GC Collection...

Wi-fi Keyboard and Mouse Combo – Rii Co...

Logitech Media Combo MK200 Full-Measurement K...


